Discover the indie games out this weekDescubre los juegos indie que salen esta semana
A hand-picked weekly pick of indie releases — games, DLC and expansions — from the hundreds that hit Steam. By Dendera Games.Selección semanal de salidas indie —juegos, DLC y expansiones— elegida a mano entre los cientos de lanzamientos de Steam. Por Dendera Games.
The Priest is a melee tank that out-heals everythingLa Priest: un tanque melee que se cura más rápido de lo que la pegan
Everyone reads the Priest as a backline healer.Todo el mundo ve a la Priest como una sanadora de retaguardia.
She's actually a melee bruiser who deals big AoE damage, heals faster than she takes hits — and, built right, keeps the whole party alive while she fights.En realidad es una bruiser cuerpo a cuerpo que pega un daño de área enorme, se cura más rápido de lo que la golpean y, bien montada, mantiene viva a toda la party mientras pelea.
TBH: Task Bar Hero · build guide · tested in-gameTBH: Task Bar Hero · guía de build · probada en el juego
The core loopEl bucle principal
Wrath of Heaven is the engine of the whole build. It's a melee-range AoE Lightning nuke that also buffs your attack — and it hits hard enough to carry the party.Wrath of Heaven es el motor de toda la build. Es un cañonazo de área (Lightning) a rango cuerpo a cuerpo que además potencia tu ataque — y pega lo suficiente para carrear a la party.
The entire build chases one thing: keep Wrath of Heaven permanent. Stack Cooldown Reduction to shrink the gap between casts and Increased Skill Duration to stretch the buff, until there's simply no downtime.Toda la build persigue una cosa: tener Wrath of Heaven permanente. Sube Cooldown Reduction para acortar el hueco entre lanzamientos e Increased Skill Duration para alargar el buff, hasta que no haya tiempo muerto.
Then you add lifesteal. Now the damage you deal heals you back faster than enemies can chip you down — and a melee that out-heals its own incoming damage is, functionally, a self-sustaining damage-tank.Luego le metes robo de vida. Ahora el daño que haces te cura más rápido de lo que los enemigos te desgastan — y un melee que se cura más de lo que recibe es, en la práctica, un tanque con daño que se autosostiene.
Stat priorityPrioridad de stats
PriorityPrioridad
WhyPor qué
Max HPVida máx.
You're melee — you eat hits between casts. HP is the buffer that keeps you standing until the next Wrath of Heaven lands.Eres melee — comes golpes entre lanzamientos. La vida es el colchón que te mantiene en pie hasta el siguiente Wrath of Heaven.
CDR + Skill DurationCDR + Skill Duration
Until Wrath of Heaven is permanent. CDR comes from the weapon, accessories and skill tree; Skill Duration comes from the helmet — there's no Skill Duration node in the tree, so the helmet roll is the key piece.Hasta que Wrath of Heaven sea permanente. El CDR viene del arma, accesorios y árbol; el Skill Duration viene del casco — no hay nodo de Skill Duration en el árbol, así que el roll del casco es la pieza clave.
LifestealRobo de vida(HP Leech)
A couple of leech gems on your accessories turns your damage into healing. This is what makes the loop self-sustaining.Un par de gemas de robo de vida en los accesorios convierten tu daño en curación. Es lo que hace que el bucle se autosostenga.
Your survival floor. The bracer and skill tree give Damage Absorption; armor engravings give Damage Reduction. (More on why DR matters so much below.)Tu base de supervivencia. El bracer y el árbol dan Damage Absorption; los engravings de armadura dan Damage Reduction. (Más abajo, por qué el DR importa tanto.)
⚠ Skip Lightning Damage %.⚠ Olvídate del Lightning Damage %.Right now it doesn't appear to increase Wrath of Heaven's damage — it looks like a bug. Don't spend gem slots or stat rolls chasing it; put those into HP, CDR and survival instead.Ahora mismo no parece aumentar el daño de Wrath of Heaven — parece un bug. No gastes gemas ni rolls persiguiéndolo; mételo en HP, CDR y supervivencia.
💡 Cast Speed is the Priest’s #1 damage stat.💡 El Cast Speed es el stat de daño #1 de la Priest.It’s what makes Wrath of Heaven’s lightning fire faster — and only Cast Speed does it. Attack Speed is dead weight on a caster: the game rolls Cast Speed on every scepter, never Attack Speed. Datamined and engine-tested — +50% Cast Speed ≈ +42% DPS, while +50% Attack Speed = +0%. Stack it on accessory gems (Black Pearl, Basilisk Scale) and your scepter’s inherent; the faster cadence also procs more lifesteal and party-heal.Es lo que hace que el rayo de Wrath of Heaven dispare más rápido — y solo el Cast Speed lo consigue. El Attack Speed es peso muerto en un caster: el juego rollea Cast Speed en todos los cetros, nunca Attack Speed. Datamineado y testeado contra el engine — +50% Cast Speed ≈ +42% DPS, mientras que +50% Attack Speed = +0%. Mételo en gemas de accesorio (Black Pearl, Basilisk Scale) y en la inherente del cetro; la cadencia más rápida también procea más robo de vida y heal de party.
Priest · Wrath of Heaven
Lv.80 · Beyond build (+ the Cosmic scepter)Nv.80 · build Beyond (+ el cetro Cosmic)
AttackAtaque
Attack DamageDaño de ataque6,524
Cast SpeedVel. lanzamiento1.54/s
Crit ChanceProb. crítico2.9%
Crit DamageDaño crítico302%
Cooldown Red.Cooldown Red.71%
Lightning DmgDaño Lightning0% ⚠
Life LeechRobo de vida11.7%
DefenseDefensa
Damage Reduction70.7%
Damage Absorption49.6%
ArmorArmadura11,286
Max HPVida máx.4,322
HP Regen/sRegen vida/s7,205
HP per HitVida por golpe+24
OtherOtros
Skill Duration+162%
Move SpeedVel. movimiento17.5%
The sweet spot in numbers: CDR sits at 71% with zero CDR gems — the skill tree + gear inherents carry it well past the perma line, and +162% Skill Duration keeps Wrath of Heaven up with margin. Every socket went into HP, DR and lifesteal instead — realistic Beyond armor (2 DR engravings a piece) stacks Damage Reduction to ~71% and Damage Absorption to ~50%, on Legendary/Immortal gems. (Chasing the bugged 100% DR is only for the deepest Torment.) Lightning Dmg 0% — the bugged stat we skip.El sweet spot en números: el CDR está a 71% sin UNA sola gema de CDR — el árbol + los inherentes del gear lo llevan muy por encima de la línea de perma, y +162% de Skill Duration mantiene Wrath of Heaven con margen. Cada socket fue a HP, DR y robo de vida — armadura Beyond realista (2 engravings de DR por pieza) sube el Damage Reduction a ~71% y el Damage Absorption a ~50%, con gemas Legendary/Immortal. (Perseguir el 100% de DR buggeado es solo para el Torment más profundo.) Daño Lightning 0% — el stat buggeado que ignoramos.
How much CDR & Skill Duration? (the sweet spot)¿Cuánto CDR y Skill Duration? (el sweet spot)
This is the part most players over-invest in. Wrath of Heaven becomes permanent the moment its cooldown is shorter than its duration:Aquí es donde la mayoría sobre-invierte. Wrath of Heaven es permanente en cuanto su cooldown es más corto que su duración:
20s × (1 − CDR) ≤ 6.5s × (1 + Skill Duration)
It's a trade-off line, not a "max both" race. A few reference points:Es una línea de equilibrio, no una carrera de "subir los dos al máximo". Unos puntos de referencia:
Skill Duration
CDR needed for permanent Wrath of HeavenCDR necesario para Wrath of Heaven permanente
0%
67.5%
50%
51%
100%
35%
The Priest crosses this almost for free: the skill tree is loaded with CDR, and a single Skill-Duration helmet (the BIS helmet rolls it, and they go up to ~300%) can carry the whole requirement by itself. Once you're past the line, more CDR or Skill Duration does nothing — Wrath of Heaven is already up 100% of the time.La Priest cruza esa línea casi gratis: el árbol está cargado de CDR, y un solo casco de Skill Duration (el casco BIS lo rollea, y llegan a ~300%) puede cubrir todo el requisito por sí solo. Una vez pasada la línea, más CDR o Skill Duration no hace nada — Wrath of Heaven ya está activo el 100% del tiempo.
So: reach the perma line, then stop.Entonces: llega a la línea de perma y para.Get there with your tree CDR + a Skill-Duration helmet (add a couple of CDR gems only if you're short), and pour every remaining socket into HP, Damage Reduction, Damage Absorption, lifesteal and damage. At level 50 your tree isn't full yet, so you lean a little more on CDR / Skill-Duration gear to cross the line; by level 80 the tree nearly does it alone, freeing almost everything for survival and damage.Llega con el CDR del árbol + un casco de Skill Duration (añade un par de gemas de CDR solo si te quedas corto), y vuelca todos los sockets restantes en HP, Damage Reduction, Damage Absorption, robo de vida y daño. A nivel 50 el árbol aún no está completo, así que te apoyas un poco más en gear de CDR / Skill Duration para cruzar la línea; a nivel 80 el árbol casi lo hace solo, liberando casi todo para supervivencia y daño.
The unique that heals your whole partyEl unique que cura a toda tu party
At endgame, one effect changes everything — and two Cosmic items carry it: the Limitless Scepter and the Fighter's Helmet.En el endgame, un efecto lo cambia todo — y lo llevan dos items Cosmic: el Limitless Scepter y el Fighter's Helmet.
"While under Wrath of Heaven buff, attacking enemies also casts Heal on allies."
With Wrath of Heaven permanent, every attack heals the team. Your lifesteal keeps you topped up; this unique keeps the party topped up. The scepter is the natural pick — it's your weapon and rolls great CDR + damage on top — but if the Cosmic scepter is out of reach, the Cosmic Fighter's Helmet grants the exact same effect. See both on the Uniques page →Con Wrath of Heaven permanente, cada ataque cura al equipo. Tu robo de vida te mantiene a ti; este unique mantiene a la party. El cetro es la elección natural — es tu arma y encima rollea buen CDR + daño — pero si el cetro Cosmic se te resiste, el Fighter's Helmet Cosmic da exactamente el mismo efecto. Ver los dos en la página de Uniques →
★ While under Wrath of Heaven buff, attacking enemies also casts Heal on allies.
The builds — open them in the AdvisorLas builds — ábrelas en el Advisor
Two ready-to-go builds. Each link opens the Upgrade Advisor pre-loaded — swap the gear and gems for what you actually own and it recalculates live.Dos builds listas para usar. Cada enlace abre el Upgrade Advisor precargado — cambia el gear y las gemas por lo que tengas y recalcula al momento.
Level 50 — self-healing damage-tankNivel 50 — tanque con daño que se autocura
Legendary / Immortal gear you can realistically assemble mid-game. Your tree isn't full yet, so you lean on CDR gems on the weapon (plus the Skill-Duration helmet) to make Wrath of Heaven permanent — then HP + Damage Reduction on armor and lifesteal on ring & earring. Skills: Wrath of Heaven + Blessing of Might.Gear Legendary / Immortal que puedes reunir de forma realista a mitad de juego. El árbol aún no está completo, así que te apoyas en gemas de CDR en el arma (más el casco de Skill Duration) para tener Wrath of Heaven permanente — luego HP + Damage Reduction en armadura y robo de vida en anillo y pendiente. Skills: Wrath of Heaven + Blessing of Might.
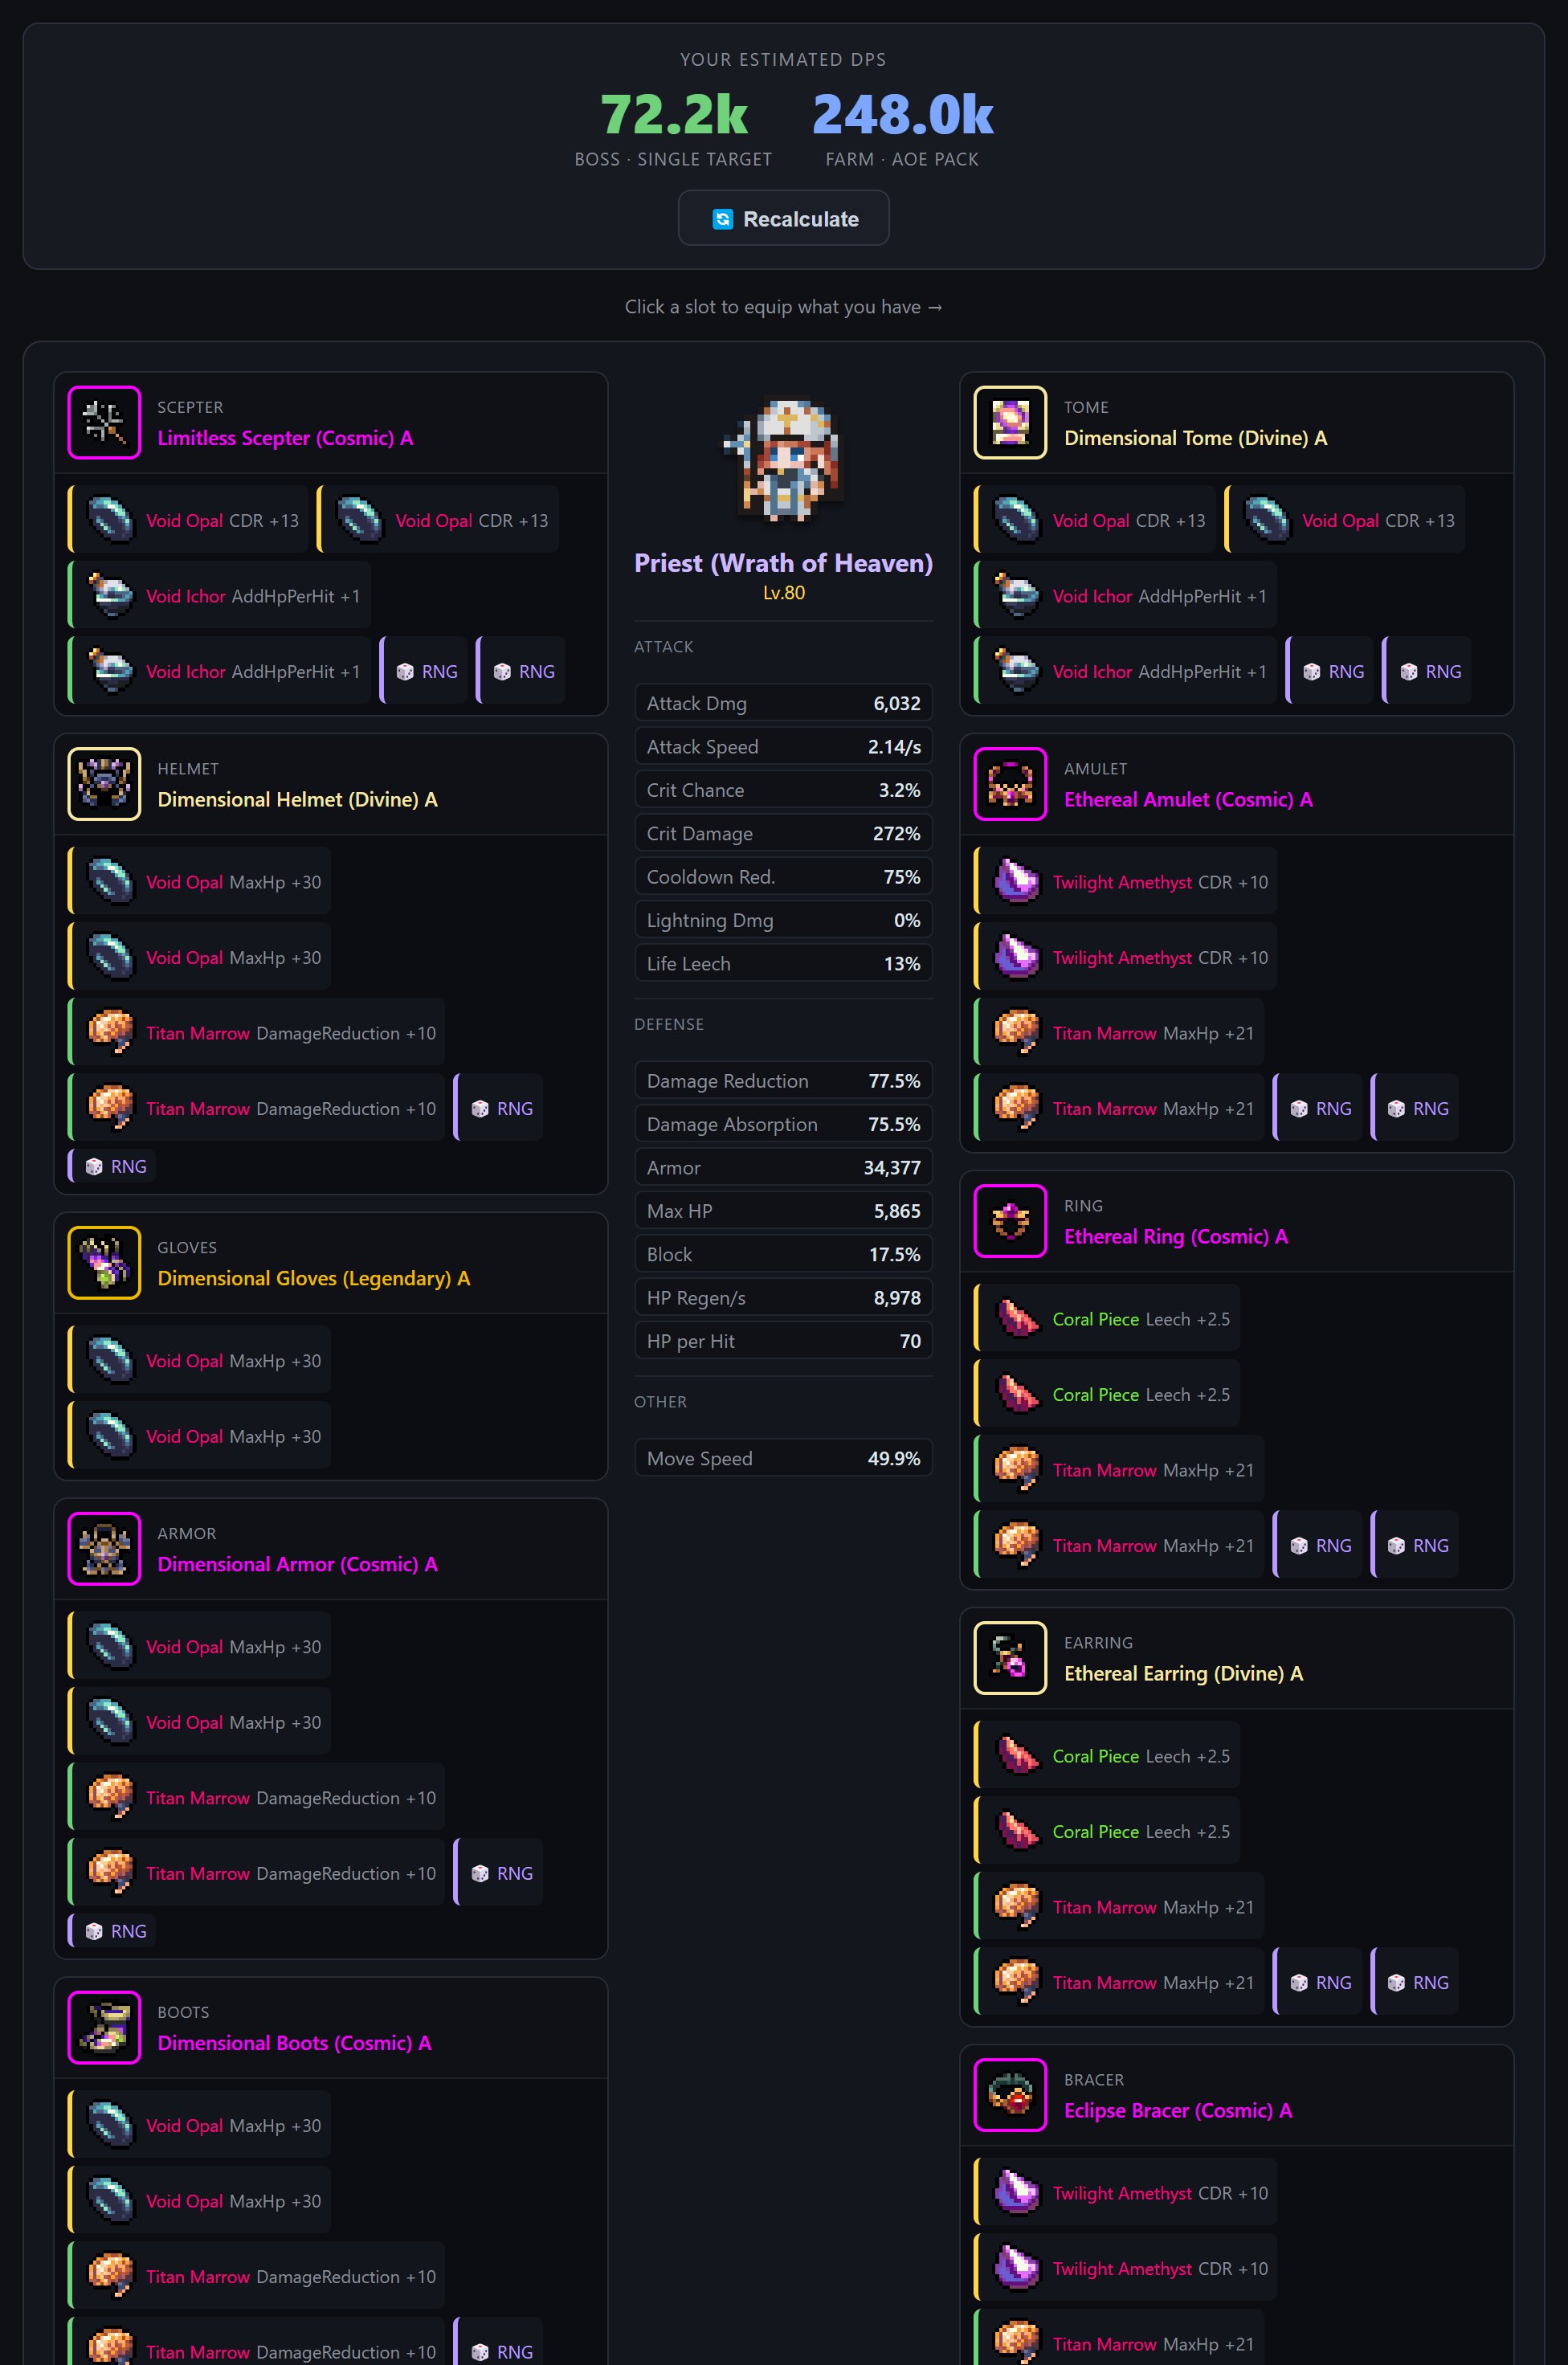
Level 80 — party-healing carryNivel 80 — carry que cura a la party
Beyond-grade gear you can realistically farm — the one Cosmic chase item is the Limitless Scepter itself (the party-heal unique). Wrath of Heaven goes permanent off the Skill-Duration helmet + full tree CDR, so the gem sockets pour into HP, Damage Reduction, lifesteal and damage instead of wasted Cooldown. The version that holds the front and heals the whole team.Gear de grado Beyond que puedes farmear de forma realista — la única pieza Cosmic "objetivo" es el propio Limitless Scepter (el unique que cura a la party). Wrath of Heaven es permanente gracias al casco de Skill Duration + el CDR completo del árbol, así que los sockets de gema van a HP, Damage Reduction, robo de vida y daño en vez de a Cooldown desperdiciado. La versión que aguanta la línea y cura a todo el equipo.
The L80 build, loaded in the Advisor.La build de Nv.80, cargada en el Advisor.
What party fits the Priest?¿Qué party encaja con la Priest?
You only get two active skills, and the Priest spends both on her own engine: Wrath of Heaven (damage) and Blessing of Might (party damage buff). The healing doesn't cost a slot — the lifesteal and the Limitless Scepter handle it. So her job in a group is clean and powerful: tank the front, deal AoE damage, buff the team's damage, and keep everyone alive.Solo tienes dos skills activas, y la Priest gasta las dos en su propio motor: Wrath of Heaven (daño) y Blessing of Might (buff de daño a la party). La curación no cuesta un slot — la dan el robo de vida y el Limitless Scepter. Así que su trabajo en grupo es limpio y potente: tanquear la línea, hacer daño de área, buffear el daño del equipo y mantener a todos vivos.
That makes her the ideal melee anchor for two ranged carries — she holds the front and soaks the pressure while they deal damage from complete safety, all three hitting harder under Blessing of Might. The recommended line-ups, all Priest + two ranged:Eso la hace el ancla melee ideal para dos carries a distancia — aguanta la línea y absorbe la presión mientras ellos hacen daño con total seguridad, los tres pegando más fuerte bajo Blessing of Might. Las comps recomendadas, todas Priest + dos a distancia:
Priest · Ranger · Sorcererthe pick — physical + magic rangedla elegida — a distancia físico + mágico
Priest · Ranger · Hunterdouble physical ranged, high critdoble a distancia físico, mucho crítico
Priest · Sorcerer · Huntercaster + crossbow, heavy AoEcaster + ballesta, mucha área
The melee carries (Knight, Slayer) work too, but they compete with the Priest for the front line — the two-ranged shells let her do what she does best: tank and heal while everyone else stays safe.Los carries melee (Knight, Slayer) también valen, pero compiten con la Priest por la línea — las comps de dos a distancia la dejan hacer lo que mejor hace: tanquear y curar mientras los demás están a salvo.
The real team in action — Priest + Ranger + Sorcerer clearing Torment 3-9. Open each live build in the Advisor:El equipo real en acción — Priest + Ranger + Sorcerer limpiando Torment 3-9. Abre cada build en el Advisor:Priest L88 · Ranger L89 · Sorcerer L70
The honest verdict — and the bug ceilingEl veredicto honesto — y el techo de bugs
Built like this, the Priest is one of the most self-sufficient picks in the game: heavy sustained damage, very hard to kill, and a genuine force-multiplier for the party.Montada así, la Priest es uno de los personajes más autosuficientes del juego: daño sostenido alto, muy difícil de matar y un multiplicador de fuerza real para la party.
But there's a ceiling, and it's propped up by two bugs stacked on top of each other.Pero hay un techo, y se sostiene sobre dos bugs encadenados.
Bug #1 — the difficulty resistance penalty.Bug #1 — el penalti de resistencia por dificultad.Each difficulty applies a flat negative resistance — Normal 0, Nightmare −20%, Hell −40%, Torment −60% — and right now it overrides your resistances instead of subtracting from them. So at Torment your resistance stats do nothing, whether you invested in them or not. Deep into Torment (around Act 2-8 onward) that becomes lethal, and the only stat that still protects a melee is Damage Reduction, which the penalty doesn't touch.Cada dificultad aplica una resistencia negativa plana — Normal 0, Nightmare −20%, Hell −40%, Torment −60% — y ahora mismo sobrescribe tus resistencias en lugar de restarlas. Así que en Torment tus stats de resistencia no hacen nada, hayas invertido o no. En Torment profundo (a partir del Acto 2-8) eso se vuelve letal, y el único stat que sigue protegiendo a un melee es el Damage Reduction, que el penalti no toca.
Bug #2 — Damage Reduction past 75%.Bug #2 — Damage Reduction por encima del 75%.Damage Reduction is meant to cap at 75% — that's what the tooltip says. Right now a second bug lets you push it all the way to 100%, and 100% DR is effectively immune to the damage DR covers. That's the only reason a melee can currently survive deep Torment: bug #2 is patching over bug #1.El Damage Reduction debería capar al 75% — es lo que dice el tooltip. Ahora mismo un segundo bug te deja subirlo hasta el 100%, y un 100% de DR es básicamente inmunidad al daño que cubre. Esa es la única razón por la que un melee aguanta hoy el Torment profundo: el bug #2 está tapando el bug #1.
Here's the catch: both will get fixed. The moment DR is capped back to 75%, or the resistance override is corrected, this entire survival path changes. So push Damage Reduction for survival today — it's the best defensive stat right now — but think twice before sinking everything into chasing the literal 100%. You'd be investing heavily in something that only works because of two temporary bugs.El truco: los dos se arreglarán. En cuanto capen el DR de nuevo al 75%, o corrijan la sobrescritura de resistencias, todo este camino de supervivencia cambia. Así que sube Damage Reduction para sobrevivir hoy — es el mejor stat defensivo ahora mismo — pero piénsatelo dos veces antes de volcarlo todo en perseguir el 100% literal. Estarías invirtiendo mucho en algo que solo funciona por dos bugs temporales.
Plan the rest of your build:Planifica el resto de tu build: